
Operation Management
Q. Can I restrict available functions by user?
A. Yes. With user authentication enabled, you can restrict functions available by user.
Q. Can I restrict available functions by user?
How to set
Tap [Utility], then select [Administrator].
Enter the password, and tap [OK].
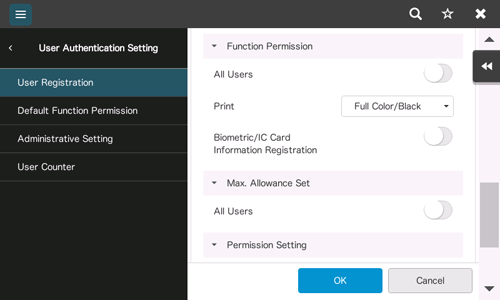
Select [User Auth/Account Track] - [User Authentication Setting] - [User Registration].
Select a user whose access to functions needs to be limited, then tap [Edit].
Tap [Function Permission] to set the limit for the respective functions.
Setting
Description
[Print]
To allow using the full print function, select [Full Color/Black]. To allow printing in black and white only, select [Black Only]. To prohibit printing, select [Restrict].
[Web Browser]
To give permission to use Web browser, select [Allow]. To give no permission to use Web browser, select [Restrict].
[Biometric/IC Card Information Registration]
When allowing the user to register or delete the user's biometric or card information, select ON. When prohibiting the user to register or delete the user's biometric or card information, select OFF.
Tap [OK].
Repeat steps 4 to 6 to restrict available functions by user.

If an attempt is made to execute a restricted function, a message appears notifying the user that it is prohibited.
Q. Can output counts be managed by user?
A. Yes. With user authentication enabled, output counts are managed by user. You can check the counts by user via the administrator settings. Also, you can set the upper limit for the number of copies that can be printed by user.
Q. Can output counts be managed by user?
Operation procedure: Checking the counter by user
Tap [Utility], then select [Administrator].
Enter the password, and tap [OK].
Select [User Auth/Account Track] - [User Authentication Setting] - [User Counter].
Select a user subject to counter checking, then tap [Detail].
To reset the counters for all users, tap [Reset All Counters], select [Yes], then tap [OK].
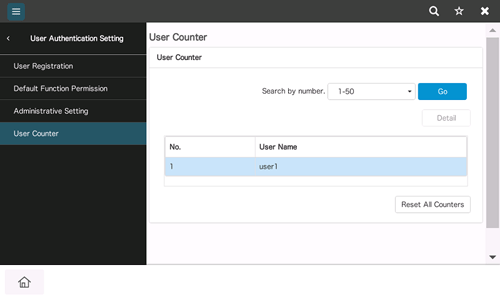
Check counters.
You can check the numbers of outputs for other functions by selecting [Print] or [Other].
To check ratios of toner or paper consumption, tap [Eco Info].
To reset the counters, select [Clear Counter], then tap [OK].
Operation procedure: Setting the upper limit for the number of copies that can be printed by user
Start a Web browser, enter the IP address of the machine in the URL field, then press the [Enter] key.
Select [Administrator], then click [Login].
Enter the password, then click [OK].
Select [User Auth/Account Track] - [User Authentication Setting] - [User Registration].
Select a user subject to upper limit restrictions, then click [Edit].
Select [Max. Allowance Set], then enter the maximum allowance for the number of originals that the user can print.
To manage the upper limit without distinguishing between the color and black originals, enter the upper limit in [Total Allowance].
Tap [OK].
Q. User authentication is enabled. Can I give permission to unregistered users (public users) to operate this machine?
A. Yes. Even unregistered users can obtain permission if permission is given to public user access. Also, you can restrict functions available to public users.
Q. User authentication is enabled. Can I give permission to unregistered users (public users) to operate this machine?
How to set
Tap [Utility], then select [Administrator].
Enter the password, and tap [OK].
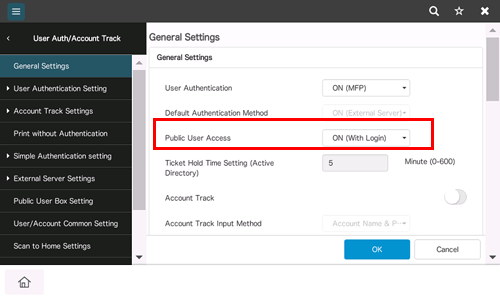
Select [User Auth/Account Track] - [General Settings].
Select [Public User Access], then [ON (With Login)] or [ON (Without Login)], and tap [OK].
If [ON (With Login)] is selected, the public user can use this machine by selecting [Public User Access] in the login page to log in to the machine.
If [ON (Without Login)] is selected, the public user can use this machine without logging in to the machine in the login page.
Selecting [ON (Without Login)] is equivalent to the status when user authentication is not performed.
Select [User Authentication Setting] - [Public User].
Select [Function Permission] to set the limit for the respective functions.
Tap [OK].
Q. Can I check the number of sheets that have been printed up to now?
A. Yes, you can check the total number of sheets that have been printed up to now.
Q. Can I check the number of sheets that have been printed up to now?
Operation method
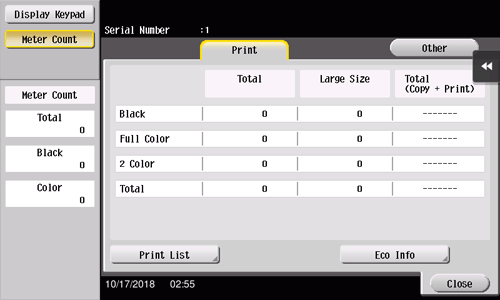
Tap [Utility], then select [Counter].
Check the number of printed sheets.
To print out the counter, tap [Print List], select a paper tray and print method, then tap [Start].
To check ratios of toner, paper, or power consumption, tap [Eco Info].
Q. The screen changes if no operation takes place for a certain period of time. Can this time setting be changed?
A. Yes, you can change the following time settings via the administrator settings.
Time to elapse before transition to the Low Power and Sleep modes
Time to elapse before all functions are reset to the default settings
Time to elapse before settings by function are reset to the default settings
Q. The screen changes if no operation takes place for a certain period of time. Can this time setting be changed?
How to set: Setting time to pass before transition to Low Power or Sleep mode
Tap [Utility], then select [Administrator].
Enter the password, and tap [OK].
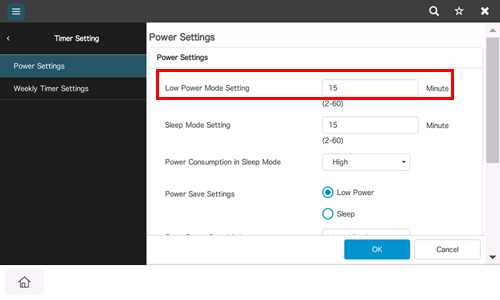
Select [Maintenance] - [Timer Setting] - [Power Settings].
To set the time to pass before entering Low Power mode, enter the time in [Low Power Mode Setting], and tap [OK].
To set the time to pass before entering Sleep mode, enter the time in [Sleep Mode Setting], and tap [OK].
More electric power will be saved in Sleep mode when compared with Low Power mode. However, Sleep mode takes more time to warm up this machine for additional print jobs than Low Power mode. Select the mode appropriate to your application of this machine.
How to set: Setting the time for the settings for all functions to return to the default settings
Tap [Utility], then select [Administrator].
Enter the password, and tap [OK].
Select [System Settings] - [Reset Settings] - [System auto reset].
Select the screen to display after resetting, and enter the time required to return to the default.
When not returning to the default, set [System auto reset function] to OFF.
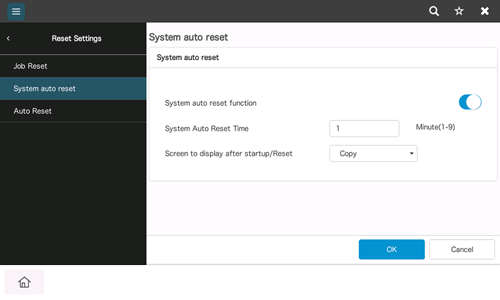
Tap [OK].
How to set: Setting the time for the settings for each function to return to the default settings
Tap [Utility], then select [Administrator].
Enter the password, and tap [OK].
Select [System Settings] - [Reset Settings] - [Auto Reset].
Select each function, and enter the time required to return to the default.
When not returning to the default, set this option to OFF.
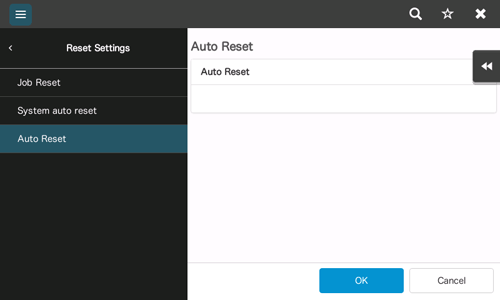
Tap [OK].