
Configuring the NetWare printing environment
Overview
This machine supports IPX, which is a communication protocol used in NetWare, enabling printing in IPX-based environment.
Setting items differ depending on the NetWare print mode. Configure the appropriate settings to suit your environment.
Purpose | Reference |
|---|---|
In Remote Printer mode using the NetWare 4.x Bindery Emulation | |
In Print Server mode using the NetWare 4.x Bindery Emulation | |
In the NetWare 4.x Remote Printer mode (NDS) | |
In the NetWare 4.x/5.x/6 Print Server mode (NDS) | |
For NetWare 5.x/6 Novell Distributed Print Service (NDPS) |
In Remote Printer mode using the NetWare 4.x Bindery Emulation
When you use the Bindery Emulation, make sure that the Bindery Emulation has been enabled on the NetWare server.
From the client, log in the NetWare file system as Bindery with the administrator authority.
Start Pconsole.
Select [Quick Setup] from [Available Option] list box, and press the Enter key.
Fill in [Print Server Name], [Printer Name], and [Print Queue Name]. Set the [Type] of the printer to [Other/Unknown], and save them.
Terminate Pconsole by pressing the Esc key.
Load the PSERVER.NLM file on the NetWare Server console.
Log in to the administrator mode of Web Connection.
In the administrator mode, select [Network] - [NetWare Setting] - [NetWare Setting], then configure the following settings.
Settings
Description
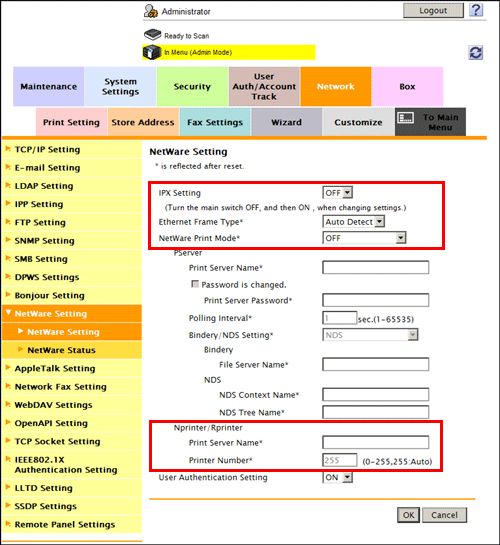
[IPX Setting]
Select [ON] to use the IPX.
[OFF] is specified by default.
[Ethernet Frame Type]
Select the Ethernet frame type according to your environment.
[Auto Detect] is specified by default.
[NetWare Print Mode]
Select [Nprinter/Rprinter].
[OFF] is specified by default.
[Print Server Name]
Enter a print server name to enable Nprinter/Rprinter (using up to 63 characters, excluding /, \, :, ;, ,, *, [, ], <, >, |, +, =, ?, and .).
Enter the print server name registered in the Pconsole.
[Printer Number]
Enter the Nprinter/Rprinter number.
[255] is specified by default.
In Print Server mode using the NetWare 4.x Bindery Emulation
When you use the Bindery Emulation, make sure that the Bindery Emulation has been enabled on the NetWare server.
When you select the Print Server mode, the IPX protocol must already be loaded on the NetWare server.
From the client, log in the NetWare file system as Bindery with the administrator authority.
Start Pconsole.
Select [Quick Setup] from [Available Option] list box, and press the Enter key.
Fill in [Print Server Name], [Printer Name], and [Print Queue Name]. Set the [Type] of the printer to [Other/Unknown], and save them.
Terminate Pconsole by pressing the Esc key.
Log in to the administrator mode of Web Connection.
In the administrator mode, select [Network] - [NetWare Setting] - [NetWare Setting], then configure the following settings.
Settings
Description
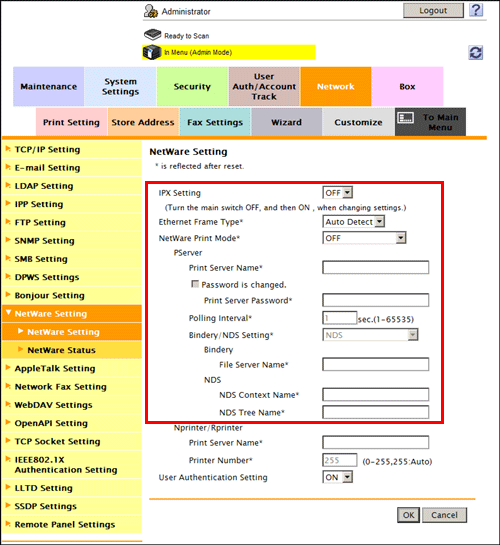
[IPX Setting]
Select [ON] to use the IPX.
[OFF] is specified by default.
[Ethernet Frame Type]
Select the Ethernet frame type according to your environment.
[Auto Detect] is specified by default.
[NetWare Print Mode]
Select [PServer].
[OFF] is specified by default.
[Print Server Name]
Enter a print server name to enable Pserver (using up to 63 characters, excluding /, \, :, ;, ,, *, [, ], <, >, |, +, =, ?, and .).
Enter the print server name registered in the Pconsole.
[Print Server Password]
If necessary, enter a print server password (using up to 63 characters).
[Polling Interval]
Set a job inquiry interval.
[1] sec. is specified by default.
[Bindery/NDS Setting]
Select [NDS/Bindery Setting].
[NDS] is specified by default.
[File Server Name]
Enter the priority file server name to be used in the Bindery emulation mode (using up to 47 characters, excluding /, \, :, ;, ,, *, [, ], <, >, |, +, =, ?, and .).
In the NetWare 4.x Remote Printer mode (NDS)
From the client, log in the NetWare file system with administrator authority.
Start NWAdmin.
Select an organization or department container for the print service, and select [Print Services Quick Setup] from the Tools menu.
Fill in [Print Server Name], [Printer Name], [Print Queue Name], and [Print Queue Volume]. Then, set the [Type] of the printer to [Other/Unknown] and save them.
Load the PSERVER.NLM file on the NetWare Server console.
Log in to the administrator mode of Web Connection.
In the administrator mode, select [Network] - [NetWare Setting] - [NetWare Setting], then configure the following settings.
Settings
Description
[IPX Setting]
Select [ON] to use the IPX.
[OFF] is specified by default.
[Ethernet Frame Type]
Select the Ethernet frame type according to your environment.
[Auto Detect] is specified by default.
[NetWare Print Mode]
Select [Nprinter/Rprinter].
[OFF] is specified by default.
[Print Server Name]
Enter a print server name to enable Nprinter/Rprinter (using up to 63 characters, excluding /, \, :, ;, ,, *, [, ], <, >, |, +, =, ?, and .).
Enter the print server name registered in the NWadmin.
[Printer Number]
Enter the Nprinter/Rprinter number.
[255] is specified by default.
In the NetWare 4.x/5.x/6 Print Server mode (NDS)
When you select the Print Server mode, the IPX protocol must already be loaded on the NetWare server.
From the client, log in the NetWare file system with administrator authority.
Start NWAdmin.
Select an organization or department container for the print service, and select [Print Services Quick Setup (non-NDPS)] from the Tools menu.
Fill in [Print Server Name], [Printer Name], [Print Queue Name], and [Print Queue Volume]. Then, set the [Type] of the printer to [Other/Unknown] and click [Create].
Log in to the administrator mode of Web Connection.
In the administrator mode, select [Network] - [NetWare Setting] - [NetWare Setting], then configure the following settings.
Settings
Description
[IPX Setting]
Select [ON] to use the IPX.
[OFF] is specified by default.
[Ethernet Frame Type]
Select the Ethernet frame type according to your environment.
[Auto Detect] is specified by default.
[NetWare Print Mode]
Select [PServer].
[OFF] is specified by default.
[Print Server Name]
Enter a print server name to enable Pserver (using up to 63 characters, excluding /, \, :, ;, ,, *, [, ], <, >, |, +, =, ?, and .).
Enter the print server name registered in the NWadmin.
[Print Server Password]
If necessary, enter a print server password (using up to 63 characters).
[Polling Interval]
Set a job inquiry interval.
[1] sec. is specified by default.
[Bindery/NDS Setting]
Select [NDS].
[NDS] is specified by default.
[NDS Context Name]
Enter an NDS context name for print server connection (using up to 191 characters, excluding /, \, :, ;, ,, *, [, ], <, >, |, +, =, ?, and .).
[NDS Tree Name]
Enter an NDS tree name for print server connection (using up to 63 characters, excluding /, \, :, ;, ,, *, [, ], <, >, |, +, =, ?, and .).
For NetWare 5.x/6 Novell Distributed Print Service (NDPS)
Before starting the NDPS setting, make sure that an NDPS broker and NDPS manager have already been created and loaded.
Check that TCP/IP protocol is configured in the NetWare server.
Check that this machine starts and an IP address is assigned.
From the client, log in the NetWare file system with administrator authority.
Start NWAdmin.
Right-click the [Organization] and [Organization unit] containers for printer agent creation, and select [NDPS Printer] from Create.
Enter a [NDPS Printer Name] in the [Printer Name] field.
Select [Create a New Printer Agent] in the [Printer Agent Source] field, and click [Create].
Confirm the printer agent name, and browse and register the NDPS manager in the [NDPS Manager Name] field.
Set the [Gateway Types] to [Novell Printer Gateway], and register it.
In the [Configure Novell NDPS for Printer Agent] screen, set the Printer to [(None)] and the port hander to [Novell Port Handler], and register the settings.
Set [Connection type] to [Remote (LPR on IP)], and register the setting.
For the host address, enter the IP address of this machine you have configured. Enter [Print] for the printer name, then press [Finish].
Display the registration window of the printer driver.
On the registration window for the printer driver, select [(None)] for both OS and finish registration.