
Q. Can I print data on an envelope or postcard?
A. Yes, you can also print on envelopes and postcards.
Execute a print job on your computer then load envelopes or postcards into this machine to execute a print job on it.
For details on the operation procedure, refer to Here.
Q. Can I print on custom size paper?
A. On the Print screen, specify the tray containing custom size paper; this will enable you to print on custom size paper.
Q. Can I print on custom size paper?
Operation method
This section explains how to load custom size paper into the Bypass Tray.
Open the file in the application, and click [File]. Then click [Print] from the menu.
Select this product from [Select Printer] (or [Printer Name]), and click [Preferences] (or [Properties]).
In [Original Size] in the [Basic] tab, select [Custom Size].
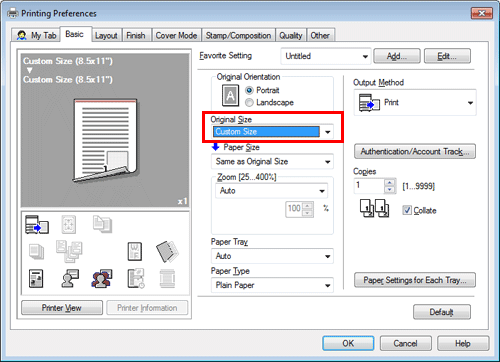
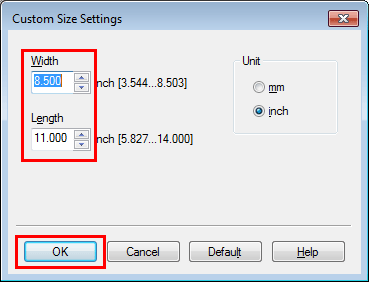
Enter the size of the paper you have loaded, then click [OK].
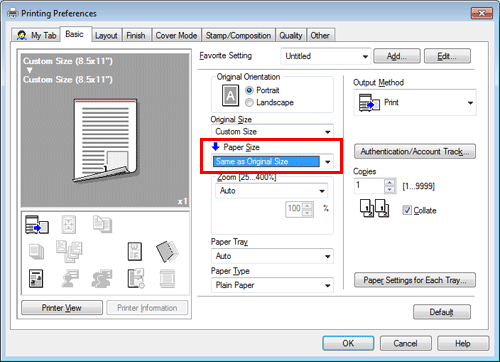
Check that [Paper Size] is set to [Same as Original Size].
Select [Bypass Tray] from [Paper Tray].
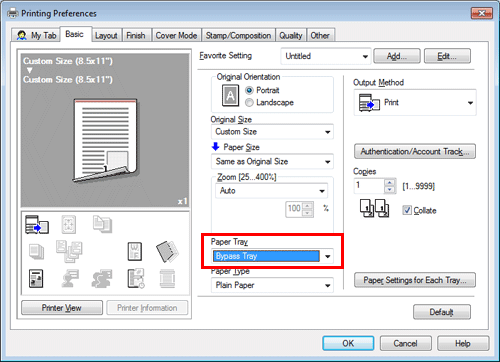
Select the desired paper type from [Paper Type].
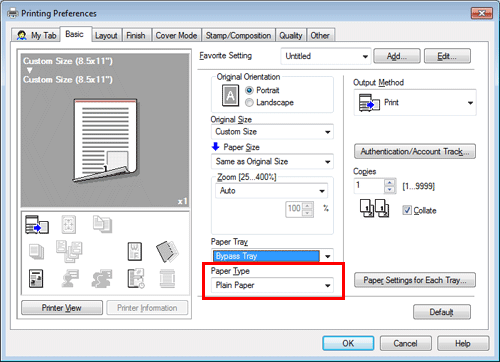
Click [OK].
Execute printing.
Load custom size paper into the Bypass Tray with the print side facing down.
For details on how to load paper into the Bypass Tray, refer to Here.
Tap [Complete] on the screen of this machine.
Q. Is it possible to configure so that black-and-white printing is always enabled?
A. Yes, you can keep black-and-white printing always enabled by changing the initial value of the printer driver.

Not only for black-and-white printing, but also the initial values of other functions frequently used can be edited so that you do not have to configure settings each time you print.
Setting black-and-white printing and 2-sided printing as initial values helps save toner and paper.
Q. Is it possible to configure so that black-and-white printing is always enabled?
Operation method
Open [Devices and Printers].
For information on how to display [Devices and Printers], refer to Here.
Right-click the icon of this machine, and click [Properties] (or [Printer Properties]).
In the [General] tab, click [Printing Preferences] (or [Basic]).
Select [Gray Scale] from [Select Color] in the [Quality] tab, then click [OK].
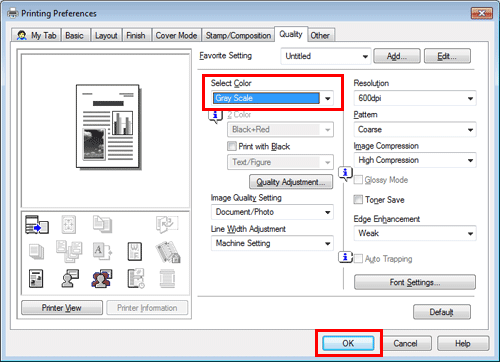
Click [OK].
The gray scale setting will be applied whenever the printer is used in any application software.
Q. Can I directly print a file in a USB memory device?
A. Yes. You can print a file simply by inserting the USB memory into the USB Port of the machine.
For details, refer to Here.
Q. How can I install the printer driver?
Q. Can I use the MFP printer function in a wireless LAN environment?
A. It is available when the MFP is equipped with the optional Wireless LAN Interface Kit.
In some cases, you need to apply the latest firmware. For details, contact your service representative.
Q. What should I do to print data in an environment with user authentication enabled?
A. When you print, you need to enter a user name and password in the printer driver.
For details on the operation procedure, refer to Here.
Q. Can printing be restricted by user?
A. Yes. You can set user authentication to restrict printing by user. That enables output control by user, leading to cost reductions.
For details on how to restrict use of the print functions for each user, refer to Here.
For details on how to specify the maximum number of printable sheets for each user, refer to Here.
Q. How can I configure the setting to make the authentication window pop up so that a user does not forget to enter authentication information when data is to be printed?
A. In the Properties window of the printer, configure the setting to display the authentication setting pop-up window when data is to be printed.
Q. How can I configure the setting to make the authentication window pop up so that a user does not forget to enter authentication information when data is to be printed?
Operation method
Open [Devices and Printers].
For information on how to display [Devices and Printers], refer to Here.
Right-click the icon of this machine, and click [Properties] (or [Printer Properties]).
In the [Settings] tab, click [Authentication Settings...].
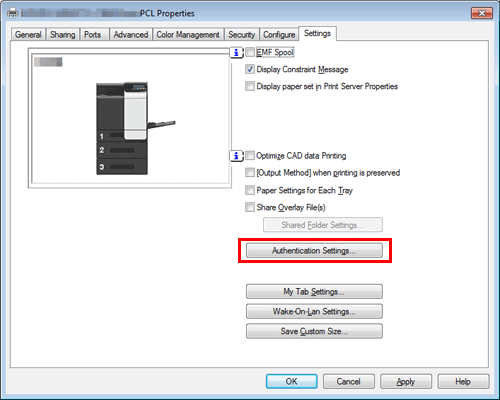
In [Authentication/Account Track], select the [Popup Authentication Dialog when printing] check box, then click [OK].

Q. Although user authentication has been successful, the input screen in the driver is grayed out.
A. In the Properties window of the printer driver, change your user authentication to the correct setting.
Q. Although user authentication has been successful, the input screen in the driver is grayed out.
How to set
Open [Devices and Printers].
For information on how to display [Devices and Printers], refer to Here.
Right-click the icon of this machine, and click [Properties] (or [Printer Properties]).
From [Device Option] in the [Configure] tab, select [User Authentication], then select the authentication status from [Setting].
The authentication status may be [ON (MFP)], [ON (External Server)], [ON (MFP) + ON (External Server)], [ON (Enhanced Server)], or [ON (MFP) + ON (Enhanced Server)] authentication. For details, contact the administrator of this machine.
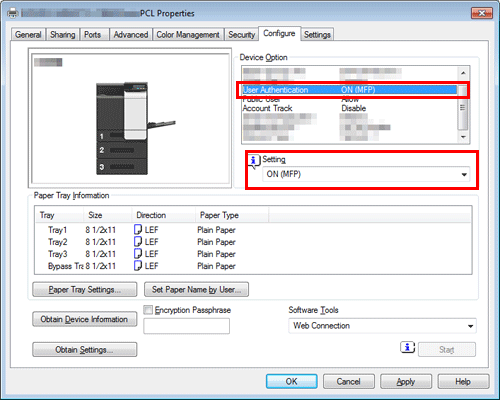
Click [OK].
Q. Can I specify the resolution for printing?
A. You can select [Resolution] on the [Quality] tab of the printer driver to specify the resolution for printing.
For details on the operation procedure, refer to Here.
Q. Can I configure a setting to skip blank pages in the original?
A. Select [Skip Blank Pages] in the [Layout] tab of the printer driver to skip blank pages when printing the original.
For details on the operation procedure, refer to Here.
Q. Characters become garbled when I print. Can I print without garbled characters being produced?
A. Yes. Try bitmap printing.
Q. Characters become garbled when I print. Can I print without garbled characters being produced?
Operation method
Open the file in the application, and click [File]. Then click [Print] from the menu.
Select this product from [Select Printer] (or [Printer Name]), and click [Preferences] (or [Properties]).
In the [Quality] tab, click [Font Settings].
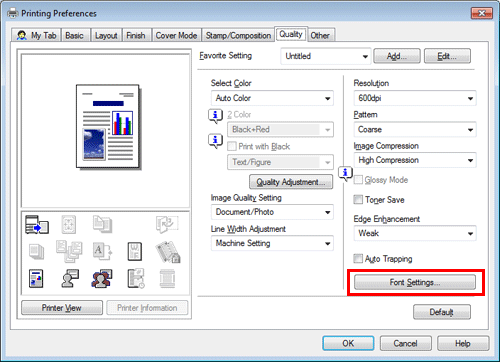
Select [Bitmap] from [Download Font Format], then click [OK].
You can also eliminate garbled characters by clearing the [Use Printer Fonts] check box.

Click [OK].
Click [Print].
Q. Can I print the cover and chapter cover on a different type of paper?
A. Yes. You can specify a different paper tray for the cover or the chapter cover for printing them on a different type of paper.


Q. Can I print the cover and chapter cover on a different type of paper?
Operation method
Open the file in the application, and click [File]. Then click [Print] from the menu.
Select this product from [Select Printer] (or [Printer Name]), and click [Preferences] (or [Properties]).
In [Paper Tray] in the [Basic] tab, select one other than [Auto].
To print the cover on a different type of paper, select the [Front Cover] check box on the [Cover Mode] tab.
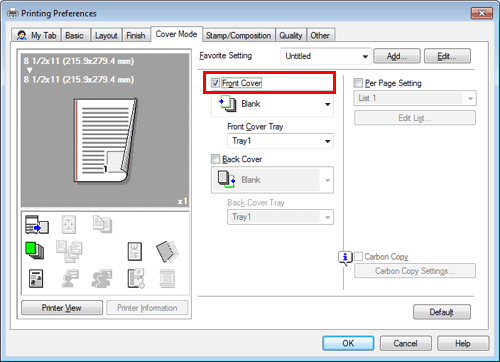
Select [Blank] or [Print] from [Front Cover] and a paper tray from [Front Cover Tray].
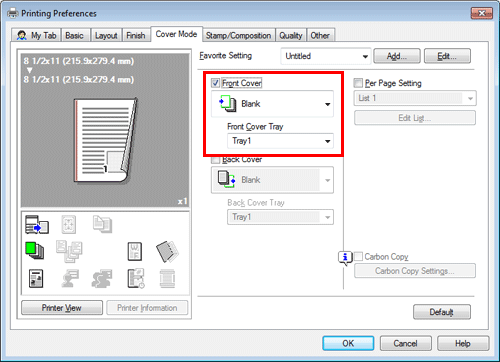
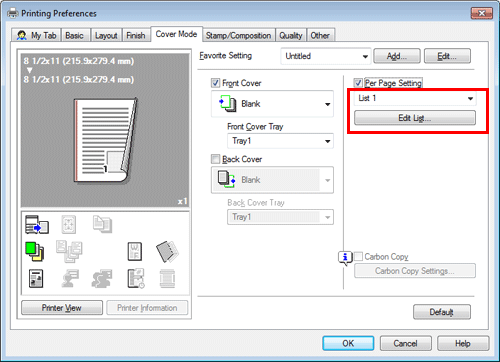
To print chapter covers on a different type of paper, select the [Per Page Setting] check box on the [Cover Mode] tab.
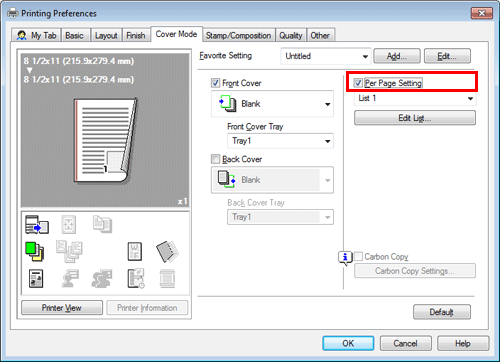
Select a list number and click [Edit List...].
Click [Add] and enter the page number(s) for chapter cover(s) in [Page Number].
To print more than one chapter cover, separate the page numbers with commas.
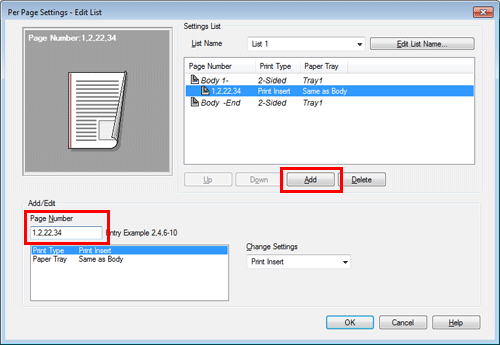
Select [Paper Tray] and select a paper tray from [Change Settings].
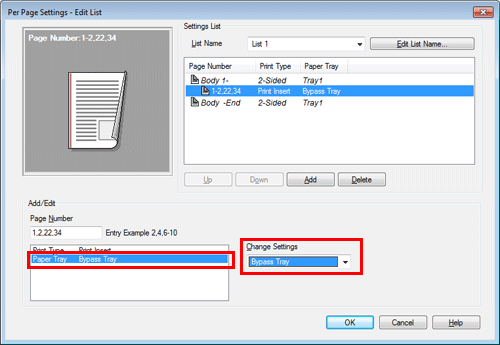
Click [OK].
Click [OK].
Click [Print].
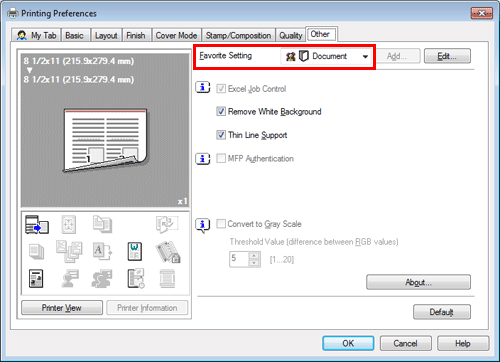
Q. Can I change the driver print setting screen to a dedicated item?
A. Yes. You can easily customize the window from the properties window of the printer driver by registering frequently used functions en masse on My Tab or registering settings for respective tabs as your favorite for quick activation.
Q. Can I change the driver print setting screen to a dedicated item?
How to set: Registering functions on My Tab
Open the file in the application, and click [File]. Then click [Print] from the menu.
Select this product from [Select Printer] (or [Printer Name]), and click [Preferences] (or [Properties]).
Click [Edit My Tab…].

To register functions on My Tab, select the functions to register from [Setting Item List] and click [to the LEFT] or [to the RIGHT].
 appears for the functions registered on the left side of My Tab and
  appears for those registered on the right.
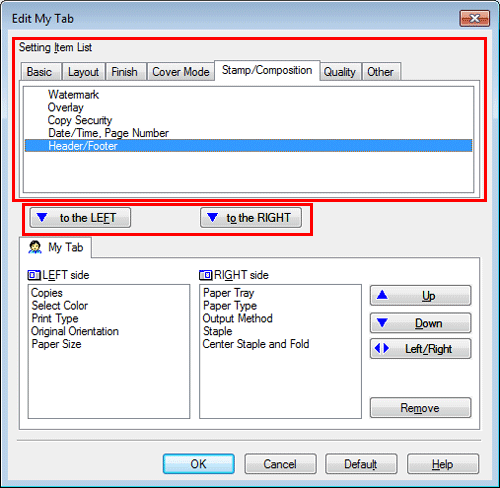
To rearrange functions registered on My Tab, select the function you want to relocate on [My Tab] and click [Up], [Down], or [Left/Right].
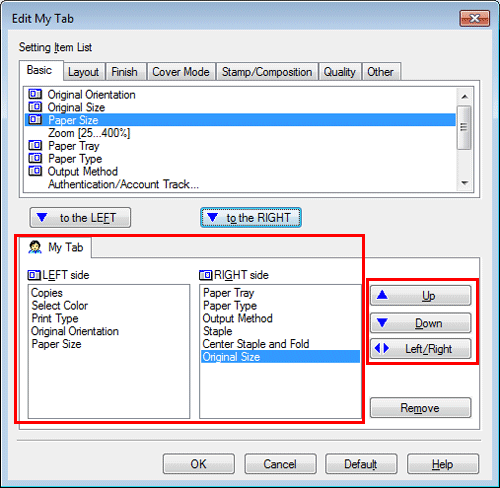
To delete a function registered on My Tab, select the function to delete on [My Tab] and click [Remove].
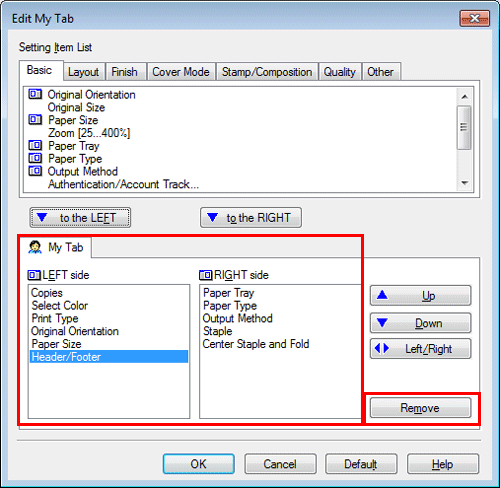
Click [OK].
How to set: Registering the settings on the properties window as favorites
Configure functions on the respective tabs on the properties window.
Click [Favorite Setting] next to the [Add] box.
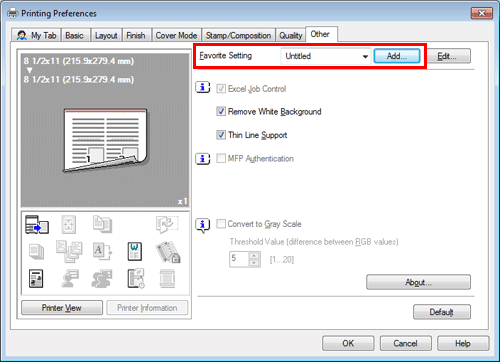
Configure the respective items for the favorite settings, then click [OK].
Settings
Description
[Name]
Enter the name of the favorite setting.
[Icon]
Select an icon to display in the Favorite Setting list.
[Sharing]
Set whether to share the favorite setting.
[Comment]
Enter description for the favorite setting.
[Restore Items]
Select the box of each item to be reflected on the settings on the properties window when the favorite setting is restored.
How to set: Restoring a favorite setting that has been registered
Select a registered favorite setting from [Favorite Setting] on the properties window.
To edit the contents of a registered favorite setting, select the target favorite setting from [Favorite Setting] and click [Edit].
You cannot edit the contents of pre-registered favorite settings.
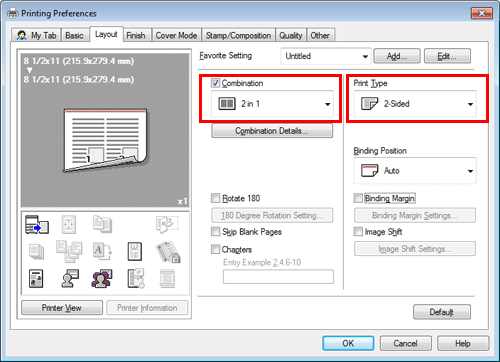
Q. Are there any paper-saving printing methods?
A. You can save paper by printing more than one original page onto the same side of a single sheet of paper or printing on both sides of sheets of paper.


Q. Are there any paper-saving printing methods?
Operation method
Open the file in the application, and click [File]. Then click [Print] from the menu.
Select this product from [Select Printer] (or [Printer Name]), and click [Preferences] (or [Properties]).
To print more than one original page onto the same side of a single sheet, select the [Combination] check box on the [Layout] tab to select a page combination format. To print on both sides of the paper, select [2-Sided] from [Print Type] on the [Layout] tab.
Click [OK].
Click [Print].
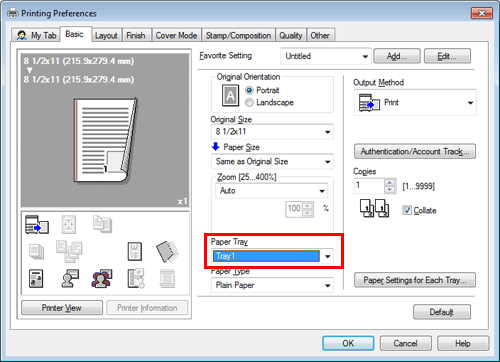
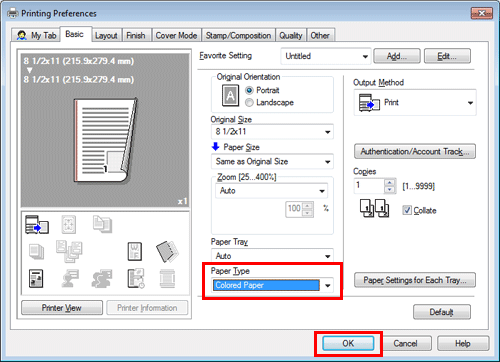
Q. How can I change the paper size and type settings?
A. You can change them in the print screen.
Q. How can I change the paper size and type settings?
Operation method
Open the file in the application, and click [File]. Then click [Print] from the menu.
Select this product from [Select Printer] (or [Printer Name]), and click [Preferences] (or [Properties]).
In [Paper Size] in the [Basic] tab, select the correct paper size.

Select the relevant paper type from [Paper Type], then click [OK].
Click [Print].
Q. Can I print characters and images so as to have them overlapped?
A. Yes, you can print with a watermark (text stamp) or a header/footer.
Also, an overlay function is provided that enables printing over an output from a file saved on a computer.
Watermark

Header/Footer

Overlay

Q. Can I print characters and images so as to have them overlapped?
Operation procedure: Printing with a watermark
Use this function to apply a mark of a confidential or critical document for copyright protection or indication of the importance of the document.
Open the file in the application, and click [File]. Then click [Print] from the menu.
Select this product from [Select Printer] (or [Printer Name]), and click [Preferences] (or [Properties]).
In the [Stamp/Composition] tab, select the [Watermark] check box, then select a watermark.
Click [Edit] to replace the watermark with another or to create a new one.
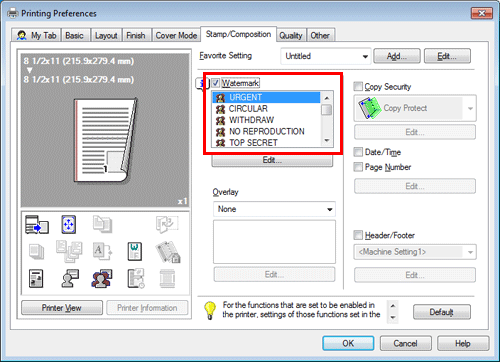
Click [OK].
Click [Print].
Operation procedure: Printing with a header/footer
Use this function to add a title of the document at the head of each page or to print with page numbers at the bottom.
Open the file in the application, and click [File]. Then click [Print] from the menu.
Select this product from [Select Printer] (or [Printer Name]), and click [Preferences] (or [Properties]).
In the [Stamp/Composition] tab, select the [Header/Footer] check box, then select information to print out.
Click [Edit...] to set the starting page and other settings for printing the header/footer.
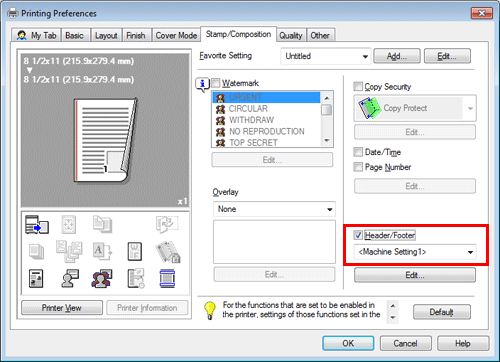
Click [OK].
Click [Print].
Operation procedure: Performing overlay print
Use this function to print by adding ruling for slips and forms or the corporate logo.
Before the overlay function can be enabled, a file for overlay printing must be created on the computer.
Open the file in the application, and click [File]. Then click [Print] from the menu.
Select this product from [Select Printer] (or [Printer Name]), and click [Preferences] (or [Properties]).
To print a document over an output of a file created on a computer, select [Print Host Image] from [Overlay] in the [Stamp/Composition] tab, then select the file for overlay printing.
Click [Edit] to specify the page and position for overlay printing.

Click [OK].
Click [Print].
Q. How can I print out data as clearly as possible?
A. Simply select the type of the document to print, and the setting is automatically changed to the optimal for clear printing.
Q. How can I print out data as clearly as possible?
Operation method
Open the file in the application, and click [File]. Then click [Print] from the menu.
Select this product from [Select Printer] (or [Printer Name]), and click [Preferences] (or [Properties]).
In [Image Quality Setting] in the [Quality] tab, select the type of document to print.
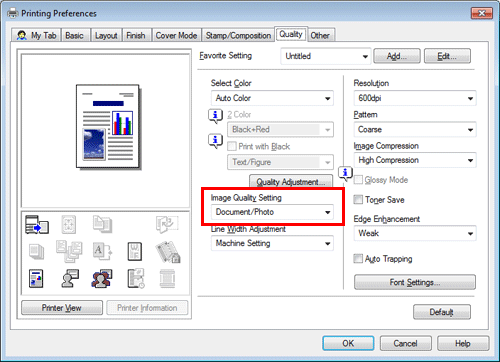
Click [OK].
Click [Print].
Q. Can I adjust the printing position in the layout setting?
A. You can shift and adjust the position of the entire print image by setting the binding margin or image shift.
Page Margin

Image Shift

Q. Can I adjust the printing position in the layout setting?
Operation method
Open the file in the application, and click [File]. Then click [Print] from the menu.
Select this product from [Select Printer] (or [Printer Name]), and click [Preferences] (or [Properties]).
To configure the page margin, select the [Binding Margin] check box on the [Layout] tab and click [Binding Margin Settings].
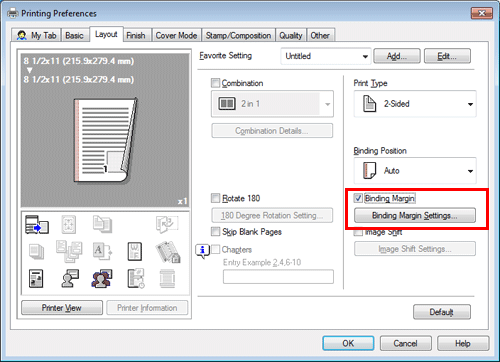
Configure the respective items for page margins, then click [OK].

Setting
Description
[Shift Mode]
Select how to process the image to prepare the page margin.
[Front Side]/[Back Side]
Enter the width of the page margin. For 2-sided printing, clearing the [Same value for front and back sides] check box allows you to specify different values for the front and back sides.
[Unit]
Select the unit for the value to set.
To enable image shift, select the [Image Shift] check box on the [Layout] tab and click [Image Shift Settings].
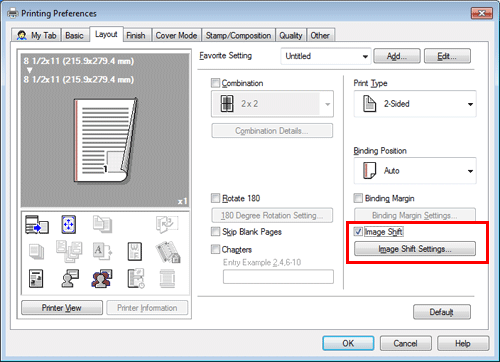
Configure the respective items for image shift, then click [OK].

Setting
Description
[Unit]
Select the unit for the value to set.
[Front Side]/[Back Side]
Set the direction and the value for shifting the printing position. For 2-sided printing, select the [Same value for Front and Back sides] check box allows you to specify the same value for the front and back sides.
Click [OK].
Click [Print].
Q. Can I print from a Mac OS PC using a USB connection?
A. It is not supported. You can print data from a Mac OS PC via the network.
Q. I want to skip the number on the front cover when adding page numbers for printing. How can I configure the setting to print the second page in the same way as the first page?
A. When specifying [Page Number] on the printer driver, set [Starting Page] to [2].
Q. I want to skip the number on the front cover when adding page numbers for printing. How can I configure the setting to print the second page in the same way as the first page?
Operation method
Open the file in the application, and click [File]. Then click [Print] from the menu.
Select this product from [Select Printer] (or [Printer Name]), and click [Preferences] (or [Properties]).
In the [Stamp/Composition] tab, select the [Page Number] check box, then click [Edit].
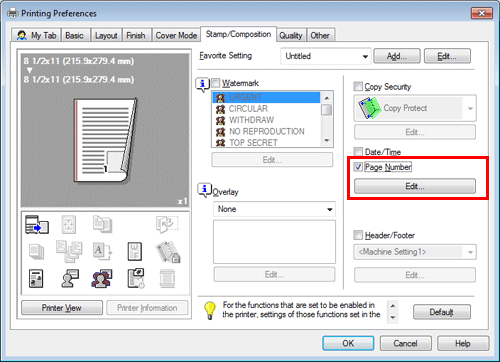
Change [Starting Page] to [2], then click [OK].

Click [OK].
Click [Print].